
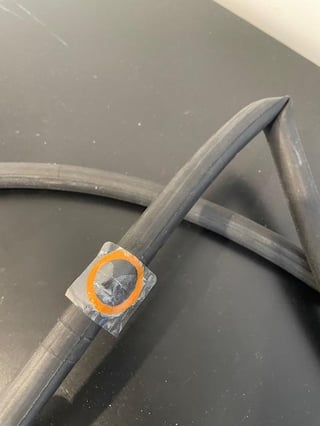
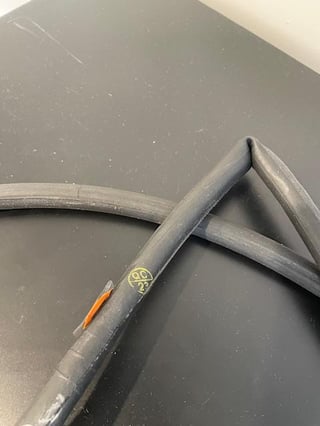
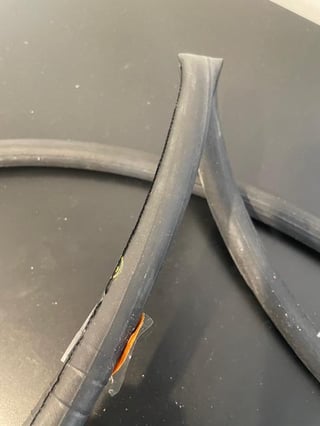
I realize this is user error so I'm trying to learn how to improve my patching technique. I sanded the area of the single puncture, applied the glue/compound to the entire area the patch would cover, waited 5 minutes, then applied the patch. I pressed and held for a few minutes but the sides didn't stick.
The challenge was that the tube is thin enough I had to wrap the edges of the patch around toward the back. This was awkward to hold, and I suspect the glue in these areas wasn't adequate. I found it very difficult to work with such a narrow surface and to basically try to apply glue to two sides of the tube without overdoing it.
The videos I'm finding online, like Park Tools, have them working with nice wide tubes where all the glue goes on one side with plenty of room to spare.
Any advice for how to improve upon this next time?
by outerspace29
21 Comments
you didn’t glue it correctly all of the black and orange needs to contact the tire with glue underneath .. then when the glue is dry you can easily peel the plastic off.
let out some air so you can flatten out the tube a bit more and use your fingers in the start to mash/massage that patch into the tire and glue.
I suggest finding some smaller patches. Then do what you did, get the tire completely flat, patch it and put something on it to keep it flat while it dries.
Use a smaller patch, and apply glue evenly to both the tube and the patch.
Apply the glue past the area the patch covers on the tube, put glue on the back side of the patch as well, especially the edges. Support the tube on something flat, so you are working with as much width as possible. Press the patch on, and rub it with a tire lever to firmly adhere it to the tube.
I’ve found that the orange adhesive layer acts as a contact adhesive that sticks pretty well from the very first. I’d sort of roll it on to the cemented area, focusing on the actual puncture spot. I wonder if you actually did get the cement out to the full area of the patch.
The glue needs to rest until it becomes tacky
I would probably only do this as a trail side fix. Get smaller patches or a new tube or go tubeless!
You did everything right but instead of manually compressing it you are supposed to put it inside a wheel and inflate so the pressure does evetything for you. (dont listen to people saying to hold it by hand)
Also the patch is too big, you need a one half the size
Press the air valve down and squeeze the tube into a ball in your hands to remove all the air.
Remove the patch. Buff the surface slightly with sand paper for better adhesion – if necessary. Cover the bottom surface of the patch completely in rubber cement.
Place the central point of the patch over the puncture, and put a heavy weight on it overnight. Make sure the tube is flat. If necessary, you can cut the edges of your patch if there is too much overhang.
deflate the tube and clamp that motherfucker, a few minutes with hand pressure is barely enough as a roadside fix, permanent fixes should be left to cure for much longer under more consistent pressure.
Small patch –> small tube, big patch –> big tube.
Smaller patches padawan. those oversized ones are overkill
You need to glue past the area of the patch and then wait for it to dry before applying the patch.
The patch is too big. You will end up with a lump on the wheel if you use that big sucker.
If you don’t have a smaller patch that works. You either throw away the tube or you can put the patch on in 2 steps. Conectarte on the left part and then the right part.
Small patch. Do this at home (i.e. carry a spare tube on rides). remove all air from tube. apply glue to a wider area, wait 5 min, apply patch, use two pieces of wood to compress patch until it sets. if your patch is bigger than the tube when it’s flattened, definitely get a smaller patch.
Here’s a $3 patch kit with lots of patches including some small ones.
https://preview.redd.it/f7pmj9u1peye1.png?width=985&format=png&auto=webp&s=9c095dc03700382892f7de4aa9c3c32eb36de1b1
[https://www.walmart.com/ip/Bicycle-Tube-Puncture-Repair-Kit-Bike-Inner-Tire-Patches-Kit-Patches-Tool-E6Z7/12532301526?wmlspartner=wlpa&selectedSellerId=101229808&selectedOfferId=1CB33A6C53583E1090CC8C903CA8E4B9&conditionGroupCode=1&wmlspartner=wlpa&cn=FY25-ENTP-PMAX_cnv_dps_dsn_dis_ad_entp_e_n&gclsrc=aw.ds&adid=2222222229712532301526_101229808_0000000000_21407473164&wl0=&wl1=x&wl2=c&wl3=&wl4=&wl5=9189636&wl6=&wl7=&wl8=&wl9=pla&wl10=655792650&wl11=online&wl12=12532301526_101229808&veh=sem&gad_source=1&gbraid=0AAAAADmfBIpohwL5z828fdtbcd_DT9w_f&gclid=Cj0KCQjw2tHABhCiARIsANZzDWqeuLUUQnoyaqkI2hMrblZttmDmJ_g_5MFmzZ95CHiQMRtszbKH_ZYaAh3IEALw_wcB](https://www.walmart.com/ip/Bicycle-Tube-Puncture-Repair-Kit-Bike-Inner-Tire-Patches-Kit-Patches-Tool-E6Z7/12532301526?wmlspartner=wlpa&selectedSellerId=101229808&selectedOfferId=1CB33A6C53583E1090CC8C903CA8E4B9&conditionGroupCode=1&wmlspartner=wlpa&cn=FY25-ENTP-PMAX_cnv_dps_dsn_dis_ad_entp_e_n&gclsrc=aw.ds&adid=2222222229712532301526_101229808_0000000000_21407473164&wl0=&wl1=x&wl2=c&wl3=&wl4=&wl5=9189636&wl6=&wl7=&wl8=&wl9=pla&wl10=655792650&wl11=online&wl12=12532301526_101229808&veh=sem&gad_source=1&gbraid=0AAAAADmfBIpohwL5z828fdtbcd_DT9w_f&gclid=Cj0KCQjw2tHABhCiARIsANZzDWqeuLUUQnoyaqkI2hMrblZttmDmJ_g_5MFmzZ95CHiQMRtszbKH_ZYaAh3IEALw_wcB)
My advice is don’t bother. Carry a spare tube.
After removing wheel/tube/tyre and finding puncture in tube:
Step 1: find source of puncture eg. Thorn in tyre and remove. Key step if you don’t want another puncture…!!
Step 2. Tube should be completely flat, remove any air if not. Use some kind of sand paper to rough up/scratch area for patch, this gives a key for adhesion. Remove debris.
Step 3. Liberally apply glue to tube, to area bit bigger than the intended patch. Leave for a few mins.
Step 4. Press on patch and use a blunt tool like a wooden spoon, ball end of a hammer to press the patch firmly onto tube, do this on a flat surface, press firmly from middle out to the outer edges all the way round. Firmly press and feather edges of patch onto tube.
Step 5. Grind chalk usually provided with kit and put onto uncured excess of glue.
Step 6. Let dry. 10 mins. Then carefully remove any plastic backing. Ideally from middle of patch towards the outer edges, you can usually rip it from middle with the careful nick with a tool. Careful not to lift edges of patch
Step 7. Use same blunt tool in step 4 to firmly press all down from middle to outer edges
Step 8. Have cuppa tea. Part inflate tube, reassemble with wheel/tire, inflate to pressure.
Just my process. I used to work in an old bike shop and we always repaired tubes. Nowadays it’s always fit new tube.
Apply vulcanizing goo generously, so it squeezes out to the edges.
I’ve had the same issue before repairing road bike tubes. I eventually switched to pre-glued patches which resolved this problem.
You may not have adequately sanded the area of the tube to be covered by the patch, looking at how smooth the tube appears in the areas where the patch peeled away.
Based on the picture I just don’t think you spread the adhesive (it’s not really glue, it reacts with the surface to break bonds and create new polymerization activation sites) in a big enough area. You should go slightly wider than the patch.