
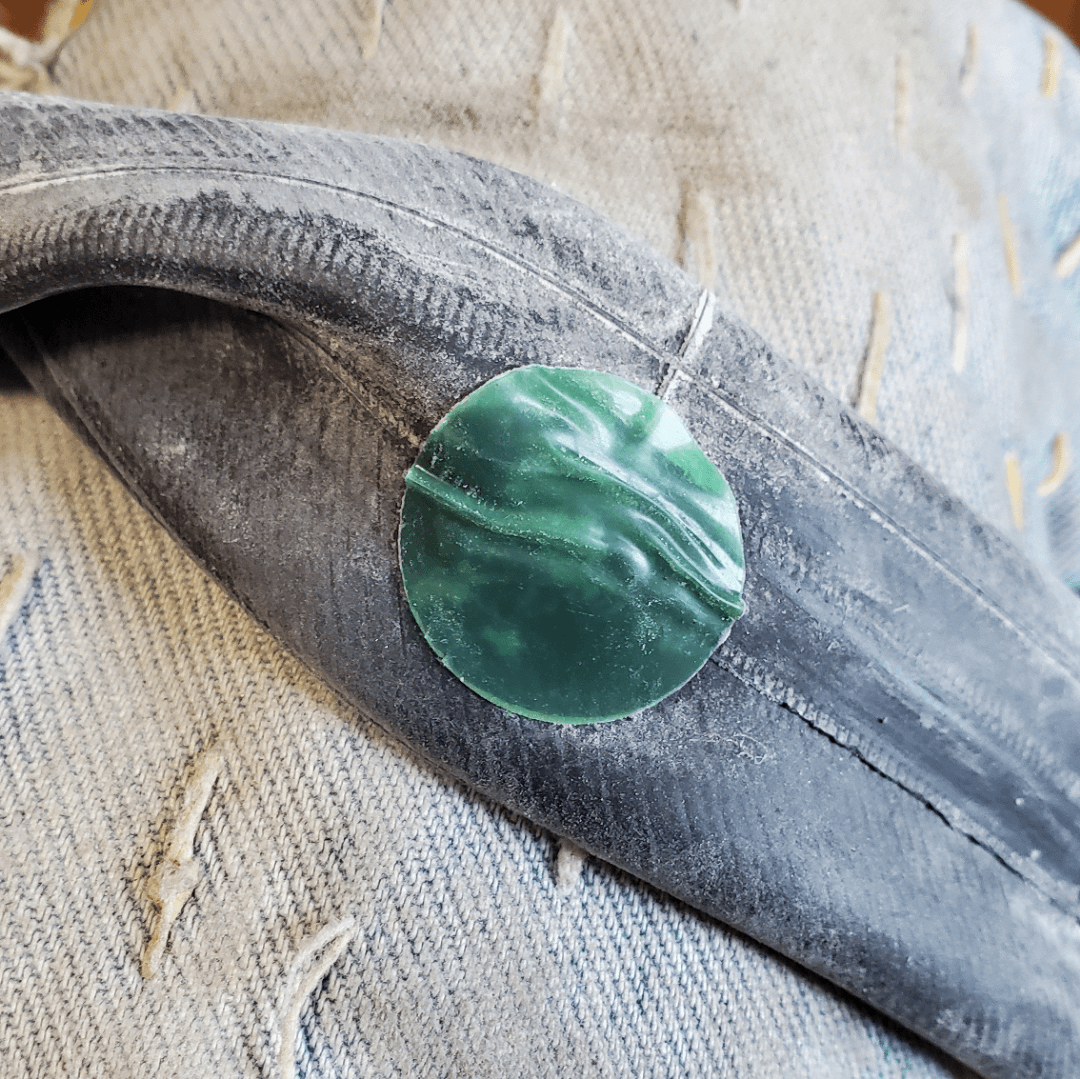
Started riding again last spring, used up my old patches (glue and rub patches) couldn’t find more had to get scabs. This is the third on this hole that failed few minutes after installation and pressurized.
1.surface cleaned 2.ruffed up 3.cleaned dryed 4. Scab applied (both inflated and un inflated). 5. Tested (looks good) 6. Installed and inflated in wheel.
Few minutes later it pops and goes flat.
by bionicpirate42
8 Comments
step 1. buy a new tube
That doesn’t look properly applied. It should be smooth, not wrinkled like that.
Also looks like that’s right on the edge of where the tube comes together. Likely not repairable at all. Replace the tube.
However, tubes are getting cheaper these days and for road, TPU or latex are definitely the way to go. For MTB, virtually everyone rides tubeless these days.
It doesn’t look like you have cleaned or sanded it very thoroughly. You should be able to see the black around the patch so you know the whole patch is on fresh rubber. Surface prep is very important when you’re gluing things together, taking a few extra minutes can make the difference
1. Clean off the talc.
2. Lightly sand an area larger than the patch.
3. Apply the vulcanising fluid to the patch in an area larger than the patch.
4. Apply vulcanising fluid to the undeside of the patch.
5. Wait 5 mintues.
6. Apply the patch to the tube.
7. Wait 1 minute.
8. Finished.
Just cut up an old tube (these are patches). Buy a can of rubber cement (this is glue). Now you have a lifetime supply of patch kits. Save up several tubes and patch them all at once. I let them set up overnight with something heavy on top.
I have gone tubeless so I don’t have to worry about patching anymore. To be honest, I miss it. I am tired of all the tubeless faff.
Your list of steps looks good, but the tube is quite dirty overall. Unless you’re out and about might be worth just replacing it.
My tips are to clean the area more thoroughly, and really apply that vulcanizing adhesive stuff. Don’t hold back. It doesn’t have to look clean since it’s the inside of the tire. You don’t even have to bother taking that little plastic backing off if it helps you hold the patch on. Once you’ve applied it, let it dry fully and very slightly overinflate the tube to test if it’s sealed. If not clean it up and try again.
Also, maybe the puncture is just too big. Or maybe it’s a weird shape. Sometimes it’s time for a new tube.
Doesn’t look like you sanded/cleaned enough. I also don’t hugely trust stick on patches (as opposed to the vulcanizing glue patches. I applaud your environmental friendliness though, so if you’re dedicated to patching tubes I’d recommend carrying a spare with you on your rides so you can take the flat tube home and properly patch it with vulcanizing glue and rubber patches. And when you do, make sure to sand much more–the sanded spot should be matte black and feel soft to the touch, almost suede-like.
Step one clean all the powder off……..