Got a 3D printer and learned some CAD software recently, its been a game changer for a lot of things, especially when you need a tool that is basically a special shape.
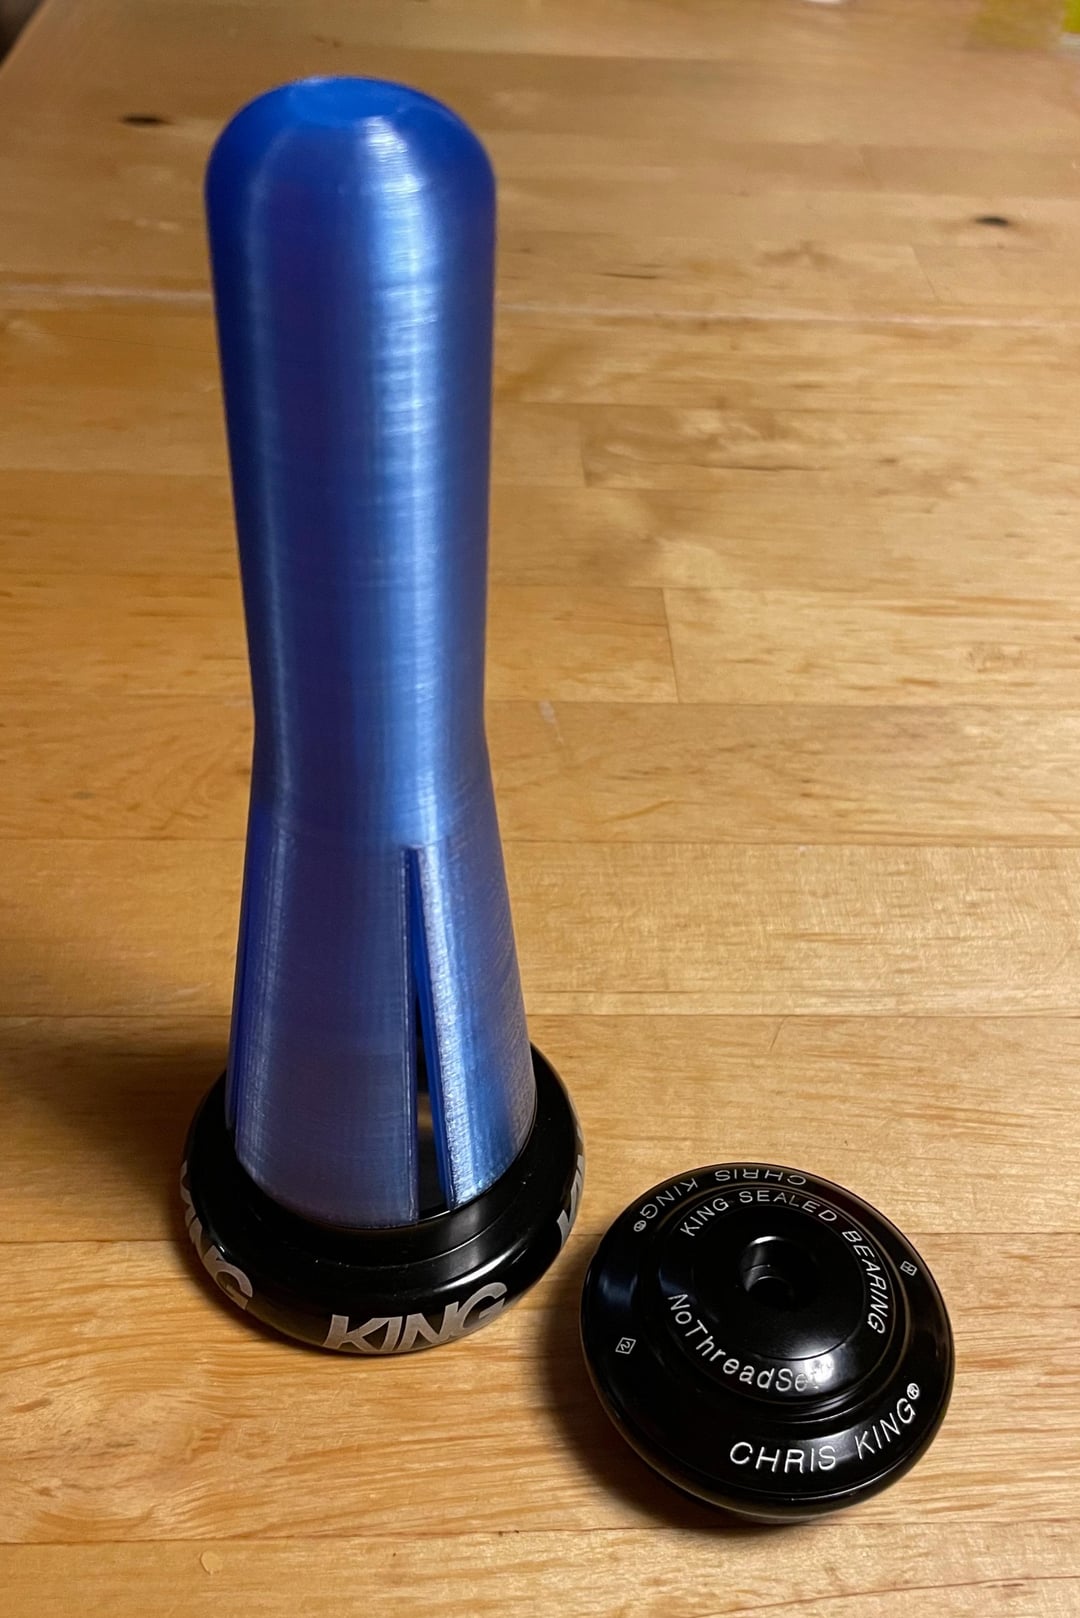
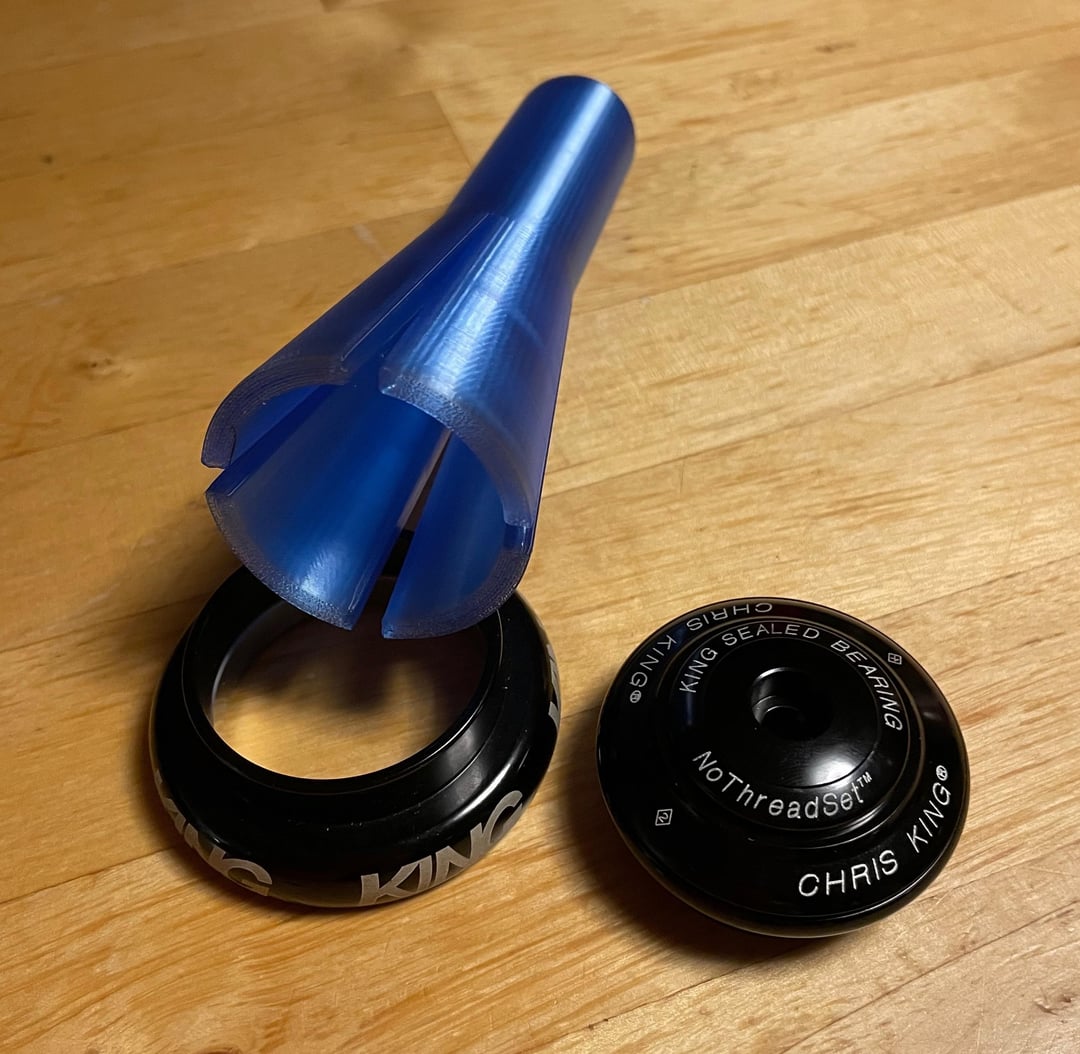
I figured I would try a headset removal tool, since I don’t have one. There are some other printable designs available on Thingiverse but nothing for a 44mm size, so I designed and printed my own. It was pretty beefy, I thought, with 5mm thick walls, 100% infill, printed in PETG (impact resistant)…
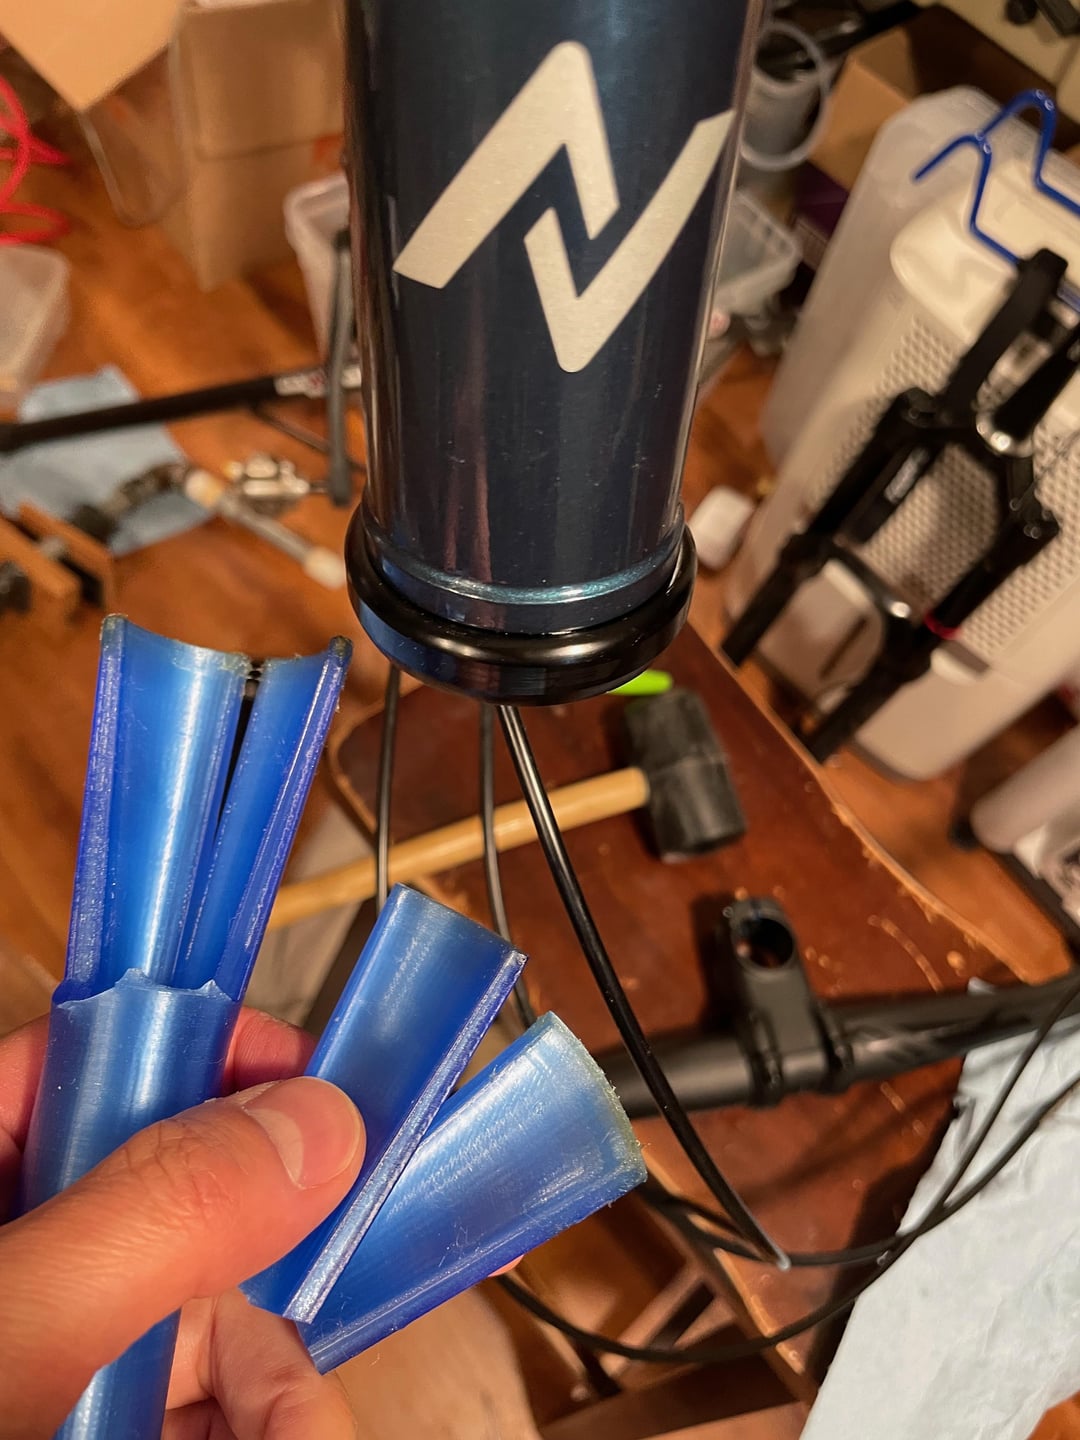
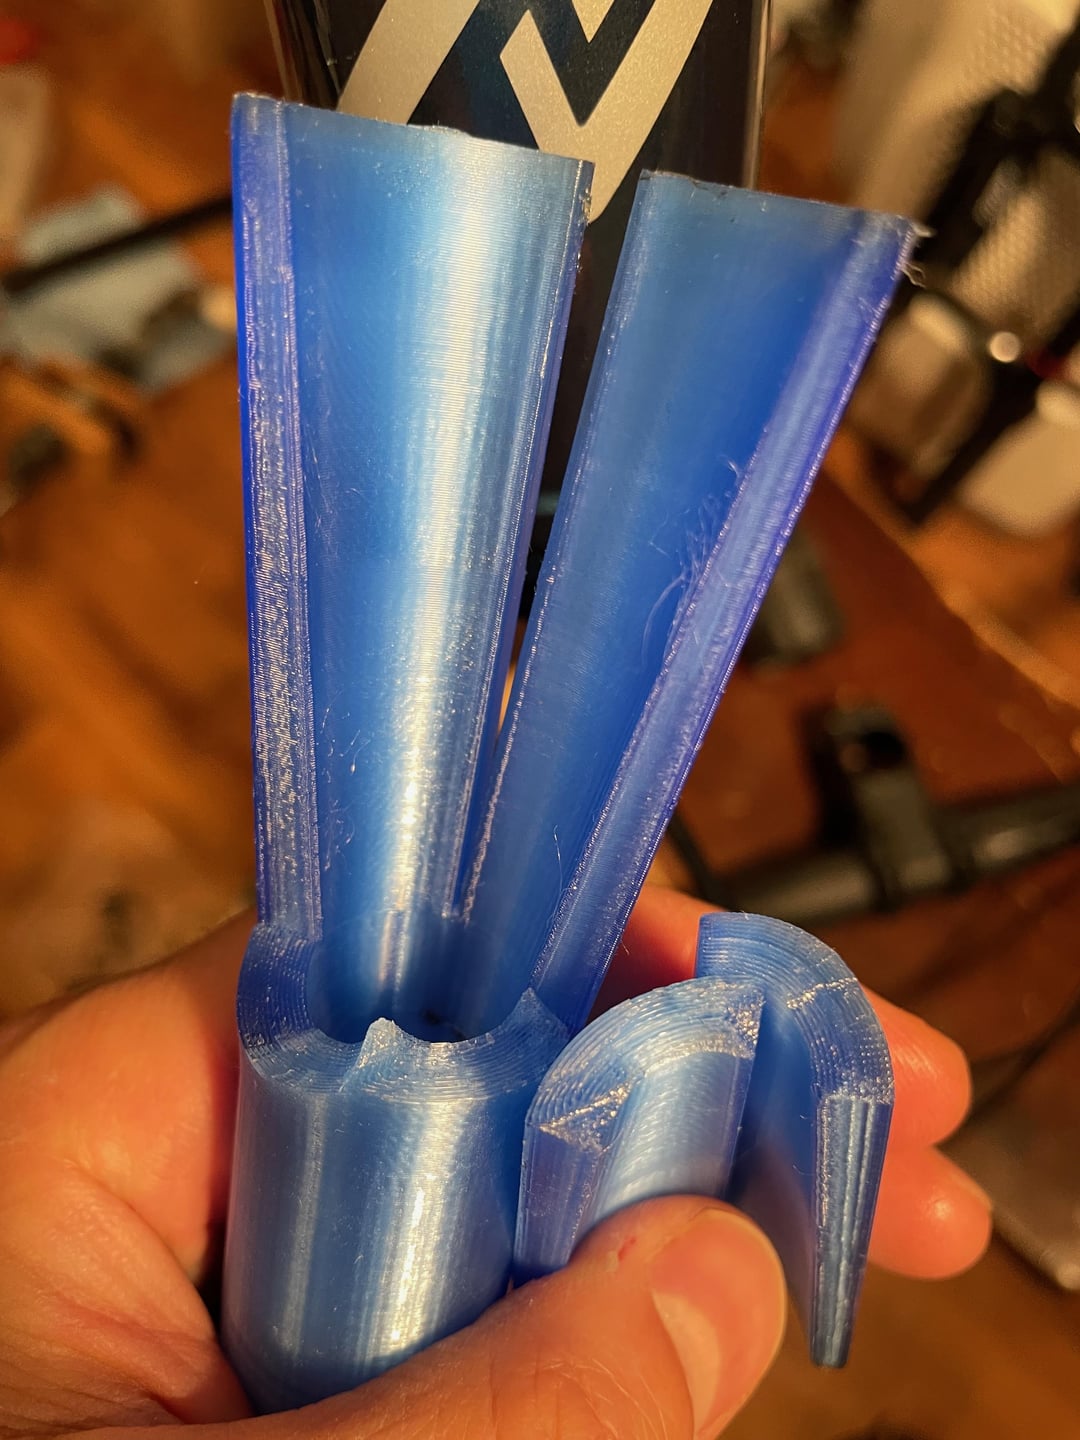
Unfortunately, it didn’t work. Even when really whaling on it with a metal hammer (rubber mallet was going nowhere), I could not get the lower cup to budge. Finally there was a crack, and one of the 4 legs snapped off.
I think *maybe* the problem was partly that the plastic tool itself was acting like a shock absorber, so the energy from the hammer wasn’t being delivered to the headset cup. I had to keep increasing the force of the blows until the plastic failed at a weak point.
Anyway, that was an interesting experiment. I’ve ordered a metal one now, hopefully that will solve the problem.
I tried 🙂
AntiqueSize6989 on
I think I will hammer plastic
rhapsodyindrew on
Nice try, but the proper tool is metal and a few mm thick, far stronger than a home 3D printed part. Don’t let this dissuade you from experimenting with 3D printing other tools though.
OscarLHampkin on
Not all is lost, looks like you can still use it for something else 👀
samquam on
I’ve used a thin (~1″x1″), square piece of lumber, just wedge against one side, hammer until it moves a bit, switch sides, repeat.
TaywuhsaurusRex on
3d printing is great for all kinds of things, but tools that require force is not generally one of them. Though, you can diy a headset tool if you have an old steel seatpost kicking around. They seem to be made of a slightly softer steel than a real tool, kinda deforms quicker than you’d expect, but it did work in a pinch for me.
JamesG60 on
Enlarge the outer circumference of the tapered and handle section so it’s straight or tapers the other way.
The problem is, apart from the weak material, is that the tool has more momentum over you than you have over it.
bandito143 on
I have a 1″ copper pipe I use for this, two cuts like your plastic device, the “prongs” or whatever you call them bent out a little bit. Works great.
JasonIsFishing on
Who could have predicted?!?!
naambezet on
That shape… straight to r/bicyclingcirclejerk
2cars10 on
Thank you for sharing this. I like 3d printing as well so it’s good to know what will work and what won’t.
wasabiguana on
Buys a $300 headset.
Refuses to buy a proper tool to install a $300 headset.
I applaud dude’s priority.
suckingalemon on
There’s a reason they build them out of metal.
Ishkabo on
Oh my god this made my day lol. Bicycle kitchens exist. Also these cups aren’t hammered in they are pressed. The tool you made looks more like a crown race setting tool.
If you really want to jury rig a press for the cups you can do it with 2 2×4 pieces, a nice thick bolt, two beeg washers and 2 nuts.
Edit: also lol at buying top of the line parts then nearly ruining them by using the wrong tools and techniques.
Bad_Alternative on
Could it have snapped because the walls are too thick to allow them to bend inwards? Or did it go in fine and snap only when hit?
squirre1friend on
I think my trip to the store to pick up some conduit and use my hack saw to cut two slits took less time and cost. I used that thing for like 8 years before it started bending. Still works but I’m about due for another $2 worth of conduit to replace it. Probably have something thicker in the scrap that’ll be more durable than the thinner conduit
coldweathershorts on
It’s a cyclinder
kevinkace on
I don’t know much about 3d printing, but it seems like if it was printed lengthwise instead of vertically it would be stronger. Ie The grain in the other direction
mondemil on
I always use a big ass wooden dowel something soft like white pine
Beluga-ga-ga-ga-ga on
The actual tools are made of steel; the printed one had pretty much zero chance of working. If you’re stuck for a tool, you can bodge one with a steel pipe and an angle grinder (it works, but it’s not pretty and *will* leave marks). You could also use a length of hardwood (one that’s actually decently hard and solid, that is), either a large diameter dowel or a stave with roughly the correct radius sanded into one end.

21 Comments
In all honesty… what the hell did you expect?
Got a 3D printer and learned some CAD software recently, its been a game changer for a lot of things, especially when you need a tool that is basically a special shape.
I figured I would try a headset removal tool, since I don’t have one. There are some other printable designs available on Thingiverse but nothing for a 44mm size, so I designed and printed my own. It was pretty beefy, I thought, with 5mm thick walls, 100% infill, printed in PETG (impact resistant)…
Unfortunately, it didn’t work. Even when really whaling on it with a metal hammer (rubber mallet was going nowhere), I could not get the lower cup to budge. Finally there was a crack, and one of the 4 legs snapped off.
I think *maybe* the problem was partly that the plastic tool itself was acting like a shock absorber, so the energy from the hammer wasn’t being delivered to the headset cup. I had to keep increasing the force of the blows until the plastic failed at a weak point.
Anyway, that was an interesting experiment. I’ve ordered a metal one now, hopefully that will solve the problem.
I tried 🙂
I think I will hammer plastic
Nice try, but the proper tool is metal and a few mm thick, far stronger than a home 3D printed part. Don’t let this dissuade you from experimenting with 3D printing other tools though.
Not all is lost, looks like you can still use it for something else 👀
I’ve used a thin (~1″x1″), square piece of lumber, just wedge against one side, hammer until it moves a bit, switch sides, repeat.
3d printing is great for all kinds of things, but tools that require force is not generally one of them. Though, you can diy a headset tool if you have an old steel seatpost kicking around. They seem to be made of a slightly softer steel than a real tool, kinda deforms quicker than you’d expect, but it did work in a pinch for me.
Enlarge the outer circumference of the tapered and handle section so it’s straight or tapers the other way.
The problem is, apart from the weak material, is that the tool has more momentum over you than you have over it.
I have a 1″ copper pipe I use for this, two cuts like your plastic device, the “prongs” or whatever you call them bent out a little bit. Works great.
Who could have predicted?!?!
That shape… straight to r/bicyclingcirclejerk
Thank you for sharing this. I like 3d printing as well so it’s good to know what will work and what won’t.
Buys a $300 headset.
Refuses to buy a proper tool to install a $300 headset.
I applaud dude’s priority.
There’s a reason they build them out of metal.
Oh my god this made my day lol. Bicycle kitchens exist. Also these cups aren’t hammered in they are pressed. The tool you made looks more like a crown race setting tool.
If you really want to jury rig a press for the cups you can do it with 2 2×4 pieces, a nice thick bolt, two beeg washers and 2 nuts.
Edit: also lol at buying top of the line parts then nearly ruining them by using the wrong tools and techniques.
Could it have snapped because the walls are too thick to allow them to bend inwards? Or did it go in fine and snap only when hit?
I think my trip to the store to pick up some conduit and use my hack saw to cut two slits took less time and cost. I used that thing for like 8 years before it started bending. Still works but I’m about due for another $2 worth of conduit to replace it. Probably have something thicker in the scrap that’ll be more durable than the thinner conduit
It’s a cyclinder
I don’t know much about 3d printing, but it seems like if it was printed lengthwise instead of vertically it would be stronger. Ie The grain in the other direction
I always use a big ass wooden dowel something soft like white pine
The actual tools are made of steel; the printed one had pretty much zero chance of working. If you’re stuck for a tool, you can bodge one with a steel pipe and an angle grinder (it works, but it’s not pretty and *will* leave marks). You could also use a length of hardwood (one that’s actually decently hard and solid, that is), either a large diameter dowel or a stave with roughly the correct radius sanded into one end.