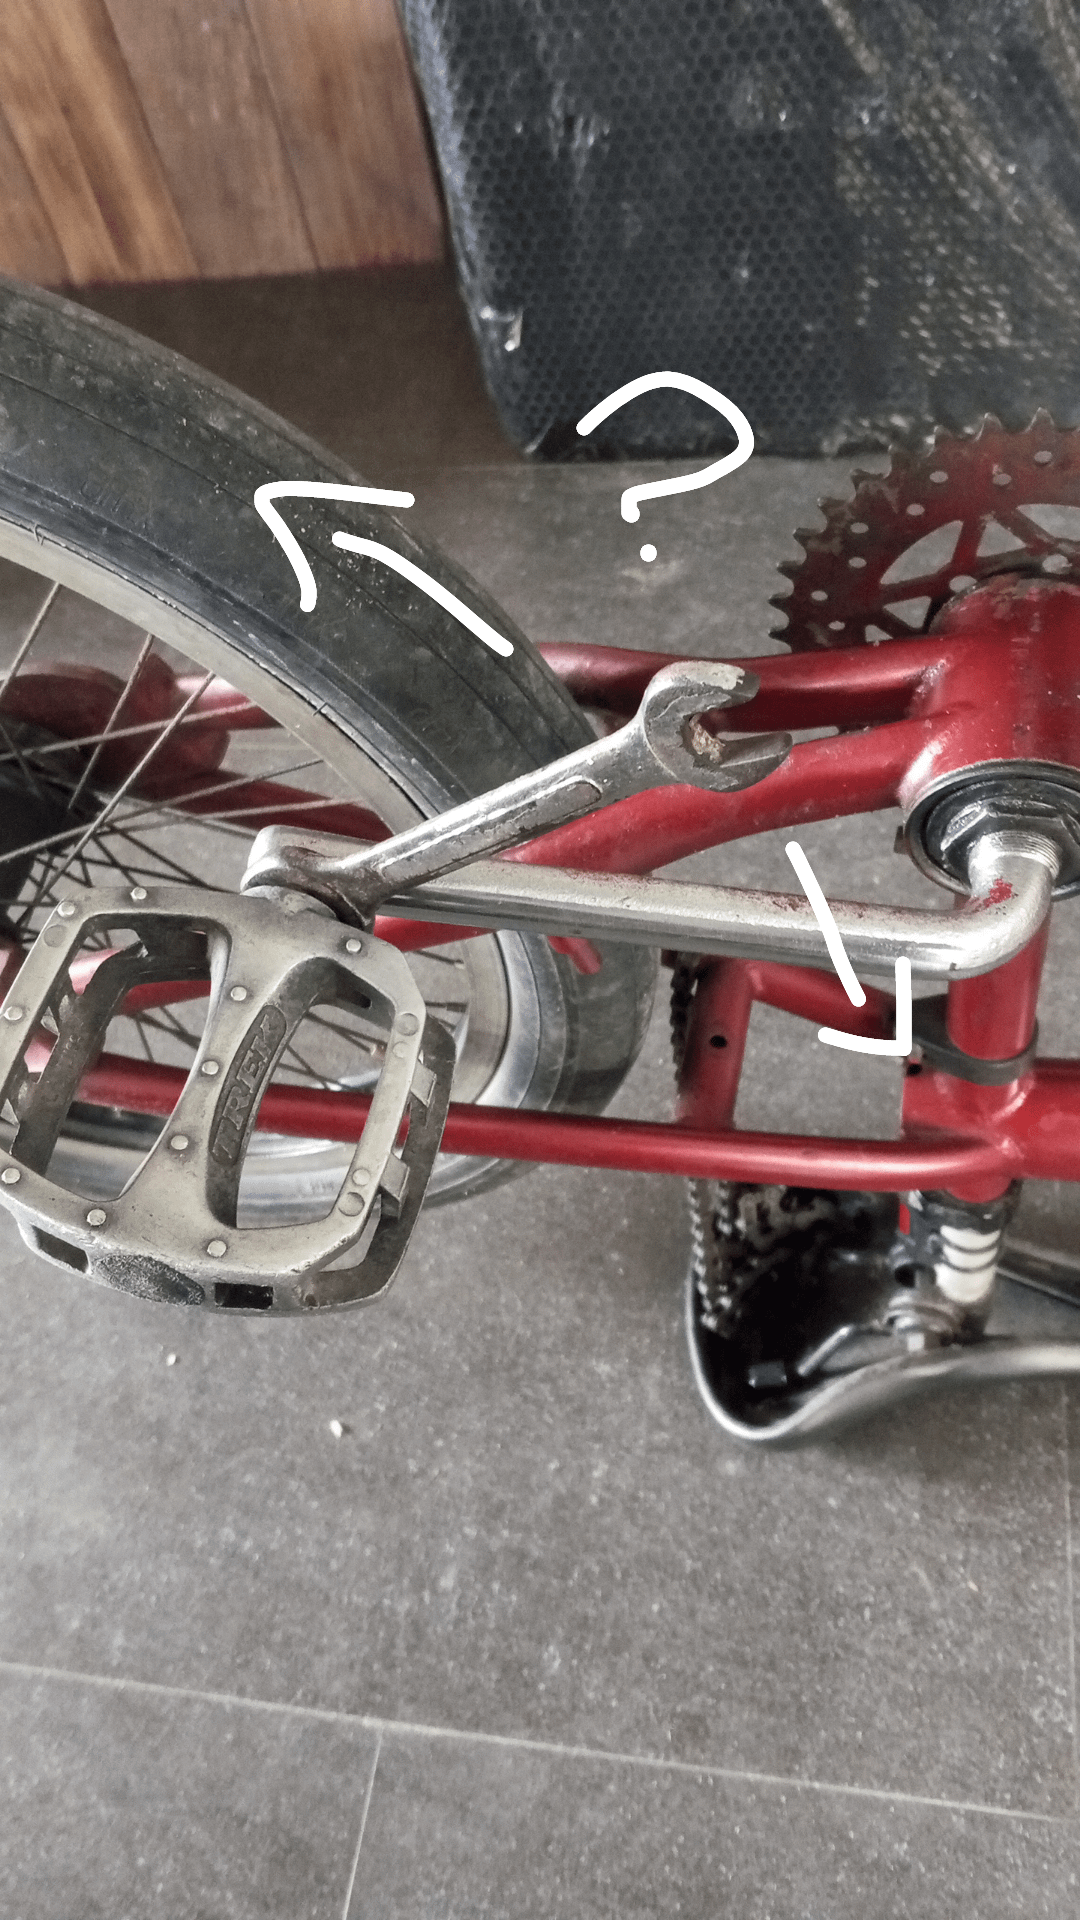
In your photo it would be the arrow pointing down.
1steverredditaccount on
On the side that’s facing you move your wrench from the seat towards the rear tire. So on the drive side counter clockwise and the non drive side clockwise.
DrivingTacks on
Tighten towards the front of the bike ( drive side pedal turns right, non drive side turns left). Opposite to remove, turns toward the back of the bike.
Unlikely-Office-7566 on
Drive side is regular righty righty thread, non drive side is left tighty reverse thread.
StevoLDevo on
Drive side pedal is normal; CW tight, CCW loose (Clock-Wise, Counter Clock-Wise).
Non-drive side is opposite. So the pedal you show in the picture is CW to loosen.
FragrantAthlete2998 on
Would be in the down arrow direction of your photo on both sides.
bbs07 on
Also you may need a longer wrench
csmdds on
It’s always the most difficult to remember loosening, but if you can remember any of these rules for installing the pedals, then you can simply reverse them for removal.
Right is right (CW), left is wrong (CCW).
Tighten the pedals the same direction the wheels roll forward.
Hold the pedal spindle and back-pedal to tighten, spinning the other direction would loosen (you will need a wrench)
buildyourown on
Left hand pedal is left hand threaded
ProjectAshamed8193 on
Right is right, left is wrong.
-sisu- on
In this photo, you’ll want to turn the wrench in the direction of the downward arrow. The left pedal, aka the non-drive side (the one without the crank) is reverse threaded – righty loosey instead of righty tighty
Joker762 on
Both sides unscrew towards the back wheel.
-ImMoral- on
Right pedal is right hand thread, left pedal left hand thread.
MasaTre86 on
Right is righthanded, Left is lefthanded.
SunCoastFunCoast on
Put on the spanner, imagine pedaling backwards.
Star4870 on
Put bike on the floor on the wheels. Stand on the right side of the bike, press on the pedal with you foot in riding direction (forward), in same time use wrench and press in opposite direction (counter-clockwise ). Now go to the left side and repeat. All pedals unscrew counter clockwise if you stand in front on them.

17 Comments
Unscrew the opposite way you pedal.
In your photo it would be the arrow pointing down.
On the side that’s facing you move your wrench from the seat towards the rear tire. So on the drive side counter clockwise and the non drive side clockwise.
Tighten towards the front of the bike ( drive side pedal turns right, non drive side turns left). Opposite to remove, turns toward the back of the bike.
Drive side is regular righty righty thread, non drive side is left tighty reverse thread.
Drive side pedal is normal; CW tight, CCW loose (Clock-Wise, Counter Clock-Wise).
Non-drive side is opposite. So the pedal you show in the picture is CW to loosen.
Would be in the down arrow direction of your photo on both sides.
Also you may need a longer wrench
It’s always the most difficult to remember loosening, but if you can remember any of these rules for installing the pedals, then you can simply reverse them for removal.
Right is right (CW), left is wrong (CCW).
Tighten the pedals the same direction the wheels roll forward.
Hold the pedal spindle and back-pedal to tighten, spinning the other direction would loosen (you will need a wrench)
Left hand pedal is left hand threaded
Right is right, left is wrong.
In this photo, you’ll want to turn the wrench in the direction of the downward arrow. The left pedal, aka the non-drive side (the one without the crank) is reverse threaded – righty loosey instead of righty tighty
Both sides unscrew towards the back wheel.
Right pedal is right hand thread, left pedal left hand thread.
Right is righthanded, Left is lefthanded.
Put on the spanner, imagine pedaling backwards.
Put bike on the floor on the wheels. Stand on the right side of the bike, press on the pedal with you foot in riding direction (forward), in same time use wrench and press in opposite direction (counter-clockwise ). Now go to the left side and repeat. All pedals unscrew counter clockwise if you stand in front on them.